Mar 7th 2021
A picture speaks a thousand words, but breaking it down could result in a "louder voice". Splitting or dividing an image tells a more in-depth story — creating a magnificent art piece that goes easier on the eyes. Additionally, each visual segment encourages viewers to admire the intricate details that may go overlooked when seen as a whole.
There are many reasons for image-splitting, such as showcasing art at a gallery or optimizing interior decor at home. The proper term for image splitting is triptych photography, which is a popular style among art enthusiasts. It makes visuals less daunting, less overwhelming, giving empty spaces more purpose and enhancing overall designs.
The process has caught so much attention that modern-day influencers have applied the triptych concept to their Instagram galleries, creating something colloquially known as grids. Splitting an image results in a beautiful collage that resembles jigsaw puzzles from childhood, and the best part is that it’s easy to achieve with the right steps.
How to Choose the Right Photos
While every image can become a triptych art piece, some visual characteristics will provide optimal results. A triptych usually involves huge horizontal (landscape format) pictures ideal for covering a wall, such as scenic shots of natural landscapes or urban skylines.
Additionally, images should typically feature high resolution, so they remain sharp when blown-up. 300 DPI is generally the gold standard when it comes down to large file formats. Always check (and edit) the resolution of your digital images before moving on to the printing stage. If you intend to use images with lower resolutions, opt for smaller frame dimensions, the type ideal for embellishing narrow wall spaces.

What Are Some Ways to Split a Picture into Pieces?
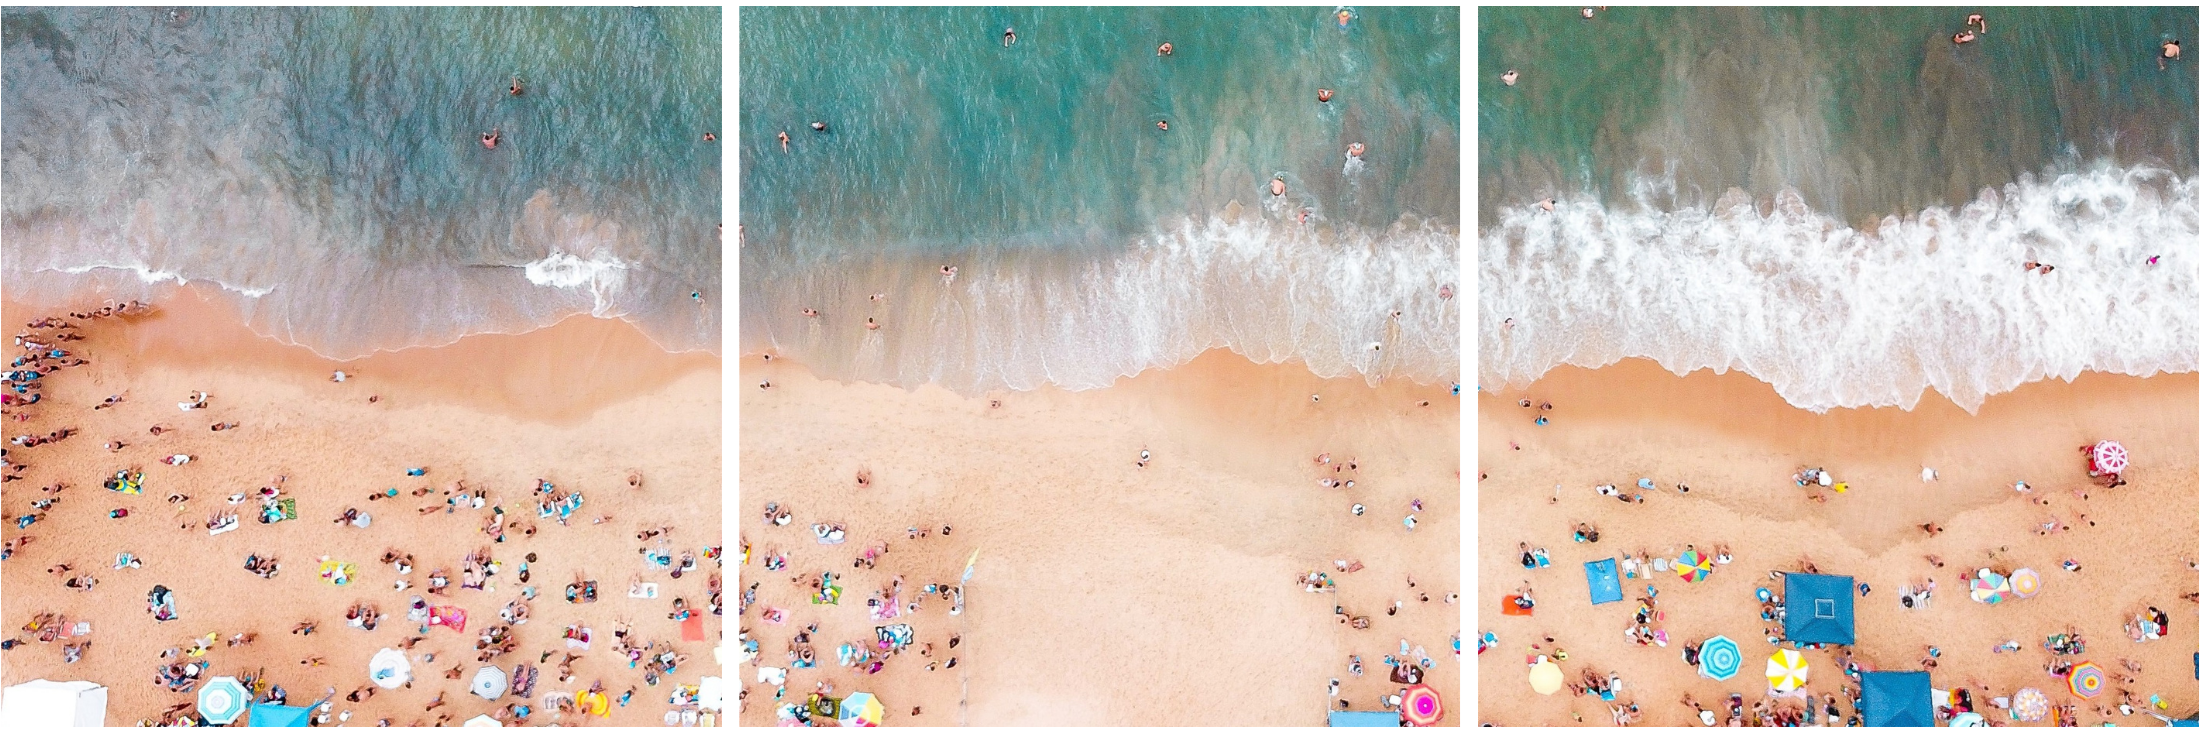
Continuity is critical with a triptych. There are two primary ways to achieve this, both with stunning results. Firstly, you may choose to merge multiple images with the same subject. For example, if you wish to capture a sunset view on a mountain, take three photos. There will be two photos, each flanking the center frame of the main subject.
Ensure that the lighting and resolution remain consistent among the images to resemble a single visual. You might consider printing your photos in full bleed (without borders), which provides a seamless triptych effect. There are many triptych configurations to choose from, depending on available wall space and style preference. The “T-split” configuration is a popular choice, featuring a larger center photograph flanked by two smaller images.
Another method involves taking a continuous panorama shot and editing it into triptych dimensions. You’ll need to crop each segment so that the contrast and clarity of the images remain uniform and uncompromised when viewers slide their eyes across each frame. The trickiest bit lies in maintaining the theme of your visual subject - but it gets easier with practice and a reliable photo-editing platform.

Cropping to Success
Cropping will help you keep the finest bits of your images while eliminating unnecessary elements. Through cropping, you can maximize the visual appeal of your split images and improve the way they look in juxtaposition. There should be a unique point of interest in every segment of your triptych image that gives viewers a reason to glance in its direction.
The rule of two-third provides a trusted yardstick to help coordinate your overall layout. By steering your subjects slightly off-center, you can guide/entice viewers to focus within the frame to pique their interests.
Additionally, you’ll need to evenly distance the blank space between each frame (usually 2-6 inches) to create a harmonious appearance of continuity. Each frame’s positioning contributes to the results - hanging them too near or far apart will ruin the illusion of continuity.
A triptych (diptych or polyptych) photo is an impressive way to spruce up spaces with a thematic statement piece. In summary, there are five simple steps to photo splitting:
Choose a high-resolution photo (or a couple of them that create the illusion of a single frame when carefully aligned).
- Crop out the unnecessary bits of each photo to focus on the most attractive details.
- Select how you’d like to separate the panels (vertically or horizontally).
- Select a suitable picture frame depending on image resolution and wall dimensions.
- Print and arrange the photos while paying heed to the white space between each segment.
Ready to create some original split photo masterpieces? Mimeo Photos offers premium photo wall decor that beautifies your interiors with prints of life’s priceless moments.